To learn how to manage your inventory within your Enzebra, check out our training videos and course resources here > Core Platform Management | Enzebra (enzebralabs.com).
Once you navigate to this link you will have to register as a user on our platform and select the Enroll Now button to enroll yourself in our FREE training on the Enzebra Core Platform. Once enrolled and registered as a user you can select the Core Platform Management course and select Go To Program to access all of the training available to you!If you prefer to read about the details, here is a summary of the Inventory Management tools included with your Enzebra:
Automated inventory management will allow you to have real-time insights and will work to ensure you never run out of supplies using our minimum and maximum notification settings. To manage your inventory, navigate to the Inventory tab located within your left navigation menu. Within the inventory drop-down menu you will find the following tabs: Items, Inventory Receiving Coucher, Inventory Delivery Voucher, Packing Lists, Internal Delivery Notes, Loss & Adjustment, Warehouse, Inventory History, and Inventory Reports. 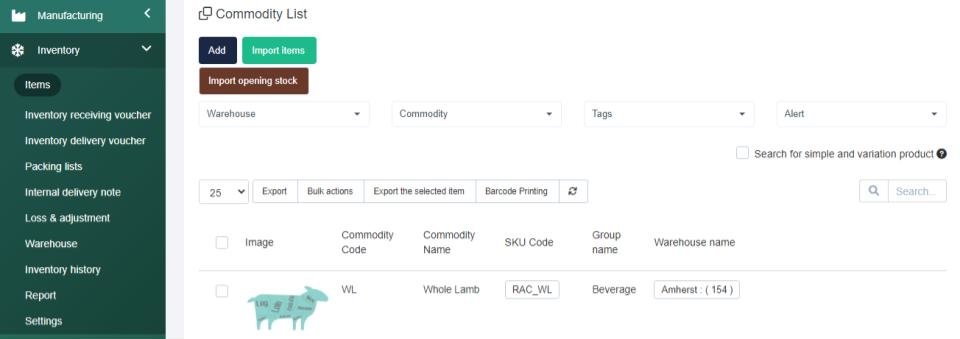
Items > This tab displays your commodity list when clicked. This shows a summary of all of your products. On this screen you can add, edit, or view items. A prompt for barcode printing is available, as well as an export list. You can also import existing inventory data if desired. To add an inventory item you have to enter the item's commodity code, name, sale, and purchase price, select tax if applicable, and add an image to easily distinguish between items. When adding or editing a commodity in your list, you can enter in the purchase and the sales price to automatically calculate your profit margins. Then you can add in the item's properties (your item’s origin, size, model, colour, style and warranty) and select whether the product can be sold, purchased, inventory, or just used in manufacturing, then enter in any product variations and save the new inventory item.
Back on the Inventory summary screen, you can filter through your list to find what you need by manually searching or applying SKU code, item description filters, or any additional filters desired.
Inventory History > This section provides real-time analytics of what is occurring within your inventory and warehouses. You can view a summary of this information in a PDF or Excel file and print it if desired. This section allows you to measure the key actionable objectives that you have to achieve to keep your projects on a timeline or to simply achieve your desired goals. An inventory valuation report is available to view at any time to reduce your administrative work from the warehouse and management system, automatically updating any changes made.
The inventory history section helps you know if your product is in the right place.
Loss & Adjustment > You can manage and track your loss and adjustments by recording the data within the system. Simply select the Add button, input the time it occurred, select the type (Loss or Adjustment Notice), then select the Warehouse this occurred within. Then use the Select Item drop-down to search through your items and when selected you will see the item, lot number, expiry date, and available quantity. From there you will have to enter the stock quantity and then hit the checkmark to record the line. You can add as many items as required. Then provide your reasoning for this entry and Save your information.
Inventory Receiving & Delivery > These sections allow you to see your inventory docket codes, supplier names, inventory value, tax amounts, and total payments that have been made. The toggle button on the top right opens an adjacent window so when you select a document, you can create tasks and reminders as you desire using the side menu that appears.
Inventory Receiving allows you to Manage Deliveries. You can see a summary page with delivery docket information and you can export this data at any time or search through using the search bar. To create an inventory Receiving Voucher, select the Delivery Docket button and then choose the details from a Purchase order, select the buyer, associated this with a project if desired, then enter in the requestor and deliverer. Then ensure the supplier name is filled from the PO, ensure the dates meet your needs, enter the type, select the department, warehouse, and expiry date, then use the Select Item dropdown to add items to the receiving voucher, then use the checkmark beside the added line item to add the item to the voucher. Then Save your data.
Inventory Delivery allows you to Manage Inventory Deliveries. On this summary page, you can export your inventory delivery docket or search through the data at any time using the search bar. You can manually change the delivery status by selecting the 3 dots beside the status to update it, If you hover over a document you will see the options to view or edit the details. To create a Delivery Voucher you can select the Export Slip button. From there you will select the appropriate invoice, the department, requestor, dates, customer name, receiver, project if applicable, type warehouse, and salesperson. Then you will use the Select Item drop-down to select items to add below. To add the line item, select the checkmark. To delete an added line, hit the red “x” beside the line. Once done, you can Save, or Save & Send Request.
Report> You can produce stock summary, inventory analytics, and inventory valuation reports by filtering through warehouses, commodities or dates and clicking filters to apply your selected filers. The section for inventory analytics that is available allows you to calculate profit rate differences between your commodities. You can export these reports as a PDF at any time by selecting export.If you have any questions about the Inventory section, navigate to the Enzebra Core - FAQs to search for answers to your questions with ease. If you have questions about managing your Inventory Setup, navigate to the Enzebra Core - Setup & Maintenance knowledge base articles.