Human Resources is at the heart of every organization. HR clearly outlines job descriptions, roles, and responsibilities, and outlines the policies and procedures for an organization. 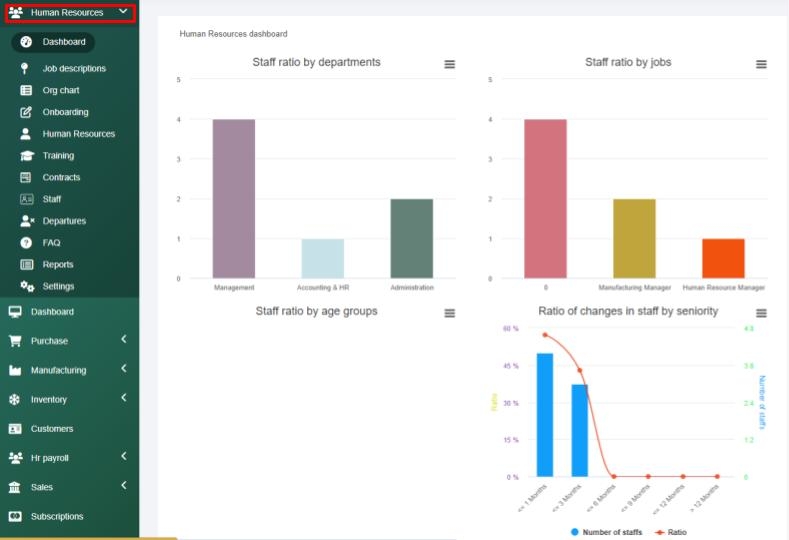
HR Dashboard > On your HR Dashboard you will be able to see staff ratios by department or jobs, ratios of changes in staff by seniority, staff status by month, birthdays that occur in the current month, and staff members that have not completed their onboarding checklist.
If at any time you want to view a chart, print a chart, or download the chart image you can select the 3-lines to the right of the chart name to access these options.
Job Descriptions > This section is where you can find all job descriptions relevant to the organization. This section is great because when someone is unsure of who is responsible for a certain action, you can reference the job descriptions to answer this question with ease.
Within this section you can export the data at any time by selecting your preferred output format, you can search through job titles, and you can conduct a bulk action to delete multiple job descriptions as desired. You can also edit, view or delete each job description. If desired you can import an excel file by selecting the Import Excel option. Once selected you will be taken to the import screen where you can download the sample file to ensure you input the data correctly. Then you can upload a file and select import.
Within the Job Descriptions section, you can add departments by selecting Departments > New Department. From there you can input the department name and description and save the department details.
Org Chart > This function allows you and your staff to view an organizational chart that shows the company logo, departments and manager for each department.
Within this section, you can view the details as a list or as a chart by selecting View Chart. You can also Add a New Department within this section by selecting the button, adding the department name, selecting the unit manager, the parent department, the unit email, and then saving the data.
Onboarding > this section allows you to create an onboarding checklist for specific staff members. To set up a checklist for a new staff member, select the Add Checklist button. From there you will select the staff member this checklist is for, and you will see the template your organization set up. You will fill out the details to meet your needs, select the training the staff must complete and then save the details. This will send an email to the new staff member to complete the required onboarding checklist and training.
Within the Onboarding tab, you can export data as you see fit or search through the data using the search bar.
Human Resources > This section allows you to see all of your staff information and you can filter this section by department, job position, status, or by using the search bar to search through the content. Within this section, you can import data from an excel file, export staff information, and view your details as a chart.
Import from Excel > To import a staff list you will need to select the import from excel button and then download the sample file to ensure you upload the data in the appropriate format. From there you will have to read the notes on this page, then attach the desired file to import and select import to add your data into the system.
Export Staffs > In order to export staff data you will have to select the staff members, then select the Export Staffs button and then Download Staffs. This will download a file to your computer containing the selected data.
View Chart > This button will allow you to view the organization's chart. Once done, you can select the “x” in the top right corner to return to the Human Resources screen.
Training > This section allows you to manage your training requirements virtually. Here you can set up training programs, and training types, and review training completion details.
Training Programs > This section is where you can set up your training program information by selecting the Add button. From there you will enter your training program title, select the associated training type, enter the minimum point, select the department the training program is for, select the job positions this training program applies to, then enter a detailed description and hit Save to save your data.
Training Types > This is where you can enter all of your policies and training requirements by selecting the Add button. From there you will select the Training Type, give the document a name, and enter in your details under the description section. Then you will save your information. After you hit save you will be able to add in training questions by selecting the Add Question button and entering your question. Then you can use the checkbox options to provide your staff with options for their response. To add an option simply select the plus icon. To remove an option select the minus icon. Then you will Save your inputs and you can view the training by selecting the eyeball icon beside Add Another Question.
Training Completion > Here you can review all of the completed training and filter this information by staff, training program, or training library.
Within any of these tabs (Training Types, Training Programs, or Training Completion) you can filter by a staff member, training library, training program, or use the search bar tool. You can also export the data at any time.
How to Add a New Staff Member >
Step 1 - Navigate to the Setup tab located at the bottom of your left navigation pane within the Enzebra Core Platform.
Step 2 - Next, select Staff and you will be taken to a Staff Summary page. 
Step 3 - From there you can select New Staff Member.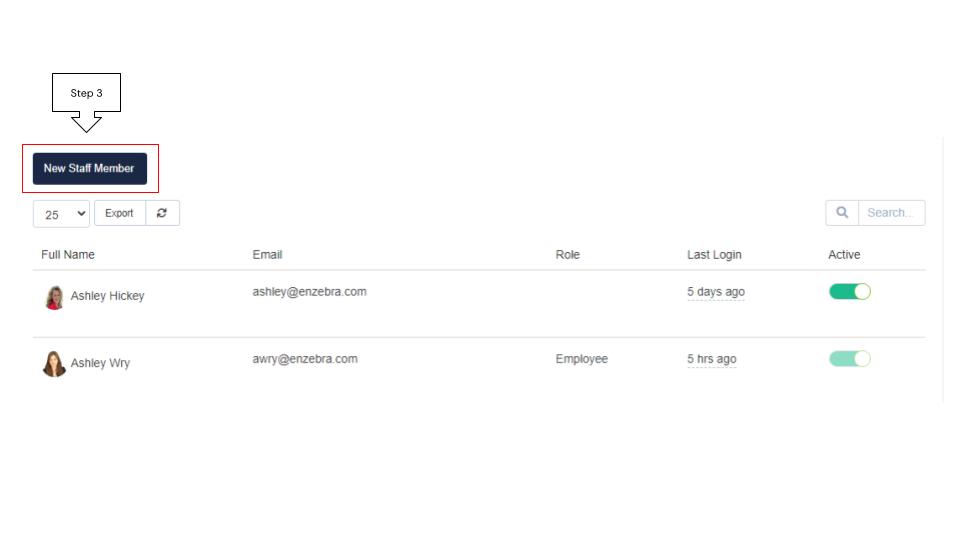
Step 4 - Once selected you will be taken to the new staff profile where you will have to fill out all of the required fields (Name, Position, Email, Status, etc).
Then you will setup the new staff's email signature, select the department they will work within, and choose to send a welcome email or not.
If the Send Welcome Email option has a checkmark, it will send an email. If it is not selected, it will not send an email.
Step 5 - Then you will set the New Staff Members Permissions by selecting into the Permissions tab.
Step 6 - Then Save your setup. 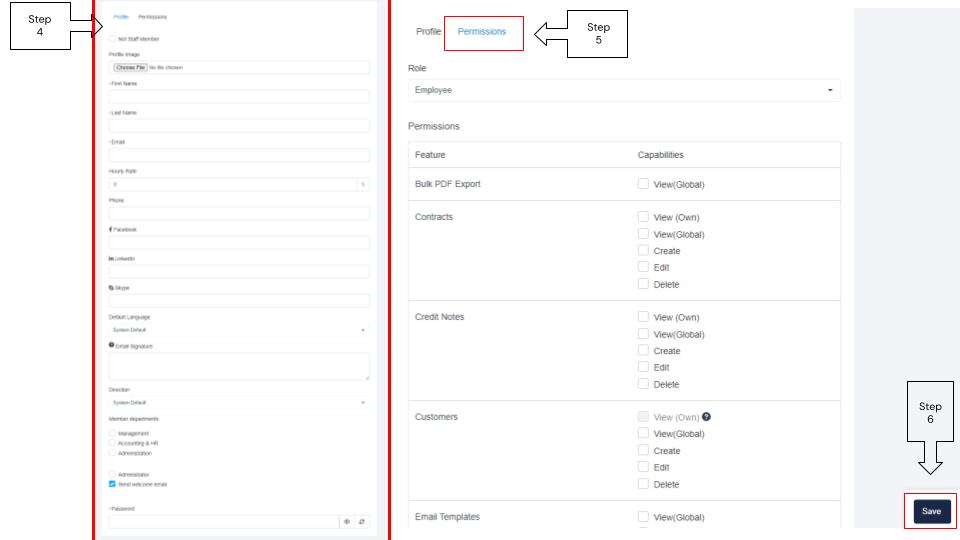
Note: The role you select for the staff member will set the permissions of what this user can access within the platform. Then you will have to set a password for the new staff member and communicate this to the new member to access the platform.
Employees can update the details that are not required on their own time within their Enzebra by accessing their Profile by selecting their picture located within the Enzebra Platform header.
IMPORTANT NOTE: If you have any questions about the HR section, navigate to the Enzebra Core - FAQs to search for answers to your questions with ease. If you have questions about managing your HR Setup, navigate to the Enzebra Core - Setup & Maintenance knowledge base articles.